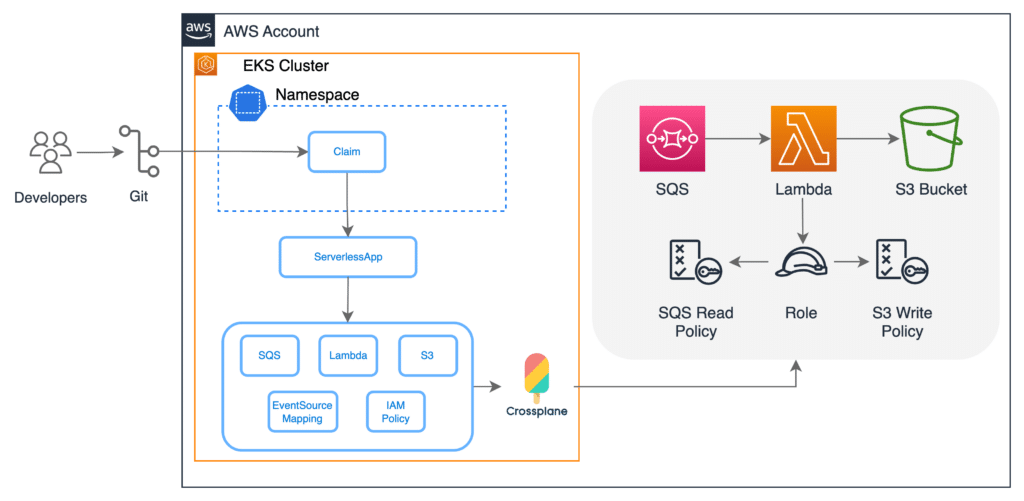
In today’s cloud-native landscape, infrastructure management is evolving beyond traditional tools. Crossplane stands out as a powerful solution that brings Kubernetes-style declarative configuration to cloud resources. In this comprehensive guide, we’ll explore how Crossplane can revolutionize your AWS resource management.
What is Crossplane?
Crossplane is an open-source CNCF project that transforms your Kubernetes cluster into a universal control plane. It extends Kubernetes’ resource model to include external services and resources, allowing you to provision and manage cloud infrastructure using the same declarative approach you use for containers.
Key Concepts
- Control Plane: Crossplane turns Kubernetes into a control plane for managing resources across multiple clouds.
- Providers: These are extensions that enable Crossplane to communicate with external APIs (like AWS).
- Composite Resources (XRs): Custom resources that abstract away complexity by grouping multiple managed resources.
- Compositions: Define how XRs map to underlying managed resources.
- Claims: Namespace-scoped requests for composite resources.
Why Use Crossplane for AWS?
Traditional AWS infrastructure management typically relies on:
- Terraform or CloudFormation templates
- AWS CLI or SDK integration
- Custom scripts and tools
Crossplane offers significant advantages:
- Unified API: Manage both Kubernetes workloads and AWS resources with a single API.
- GitOps Friendly: Resources defined as YAML fit perfectly into GitOps workflows.
- Fine-grained RBAC: Leverage Kubernetes RBAC for infrastructure access control.
- Custom Abstractions: Create application-specific abstractions that hide cloud complexity.
- Multi-cloud Consistency: Use the same patterns across AWS, GCP, Azure, and others.

Getting Started with Crossplane for AWS
Prerequistes:
- a Kubernetes cluster with at least 2 GB of RAM
- permissions to create pods and secrets in the Kubernetes cluster
- Helm version v3.2.0 or later
- an AWS account with permissions to create an S3 storage bucket
- AWS access keys
Step 1: Install Crossplane
Install Crossplane using Helm:
					# Add Crossplane Helm repository
helm repo add crossplane-stable https://charts.crossplane.io/stable
helm repo update

# Install Crossplane
helm install crossplane \
  crossplane-stable/crossplane \
  --namespace crossplane-system \
  --create-namespace
Verify the installation:
kubectl get pods -n crossplane-system
Step 2: Install the AWS Provider
To manage AWS resources, you need to install the AWS provider:
					kubectl apply -f - <<EOF
apiVersion: pkg.crossplane.io/v1
kind: Provider
metadata:
  name: provider-aws
spec:
  package: xpkg.upbound.io/crossplane-contrib/provider-aws:v0.36.0
EOF
Wait for the provider to become healthy:
kubectl get providers.pkg.crossplane.io
Step 3: Configure AWS Credentials
Crossplane needs AWS credentials to manage resources. Create a credentials file:
					# aws-credentials.yaml
apiVersion: v1
kind: Secret
metadata:
  name: aws-creds
  namespace: crossplane-system
type: Opaque
data:
  credentials: BASE64ENCODED_AWS_CREDENTIALS
Replace BASE64ENCODED_AWS_CREDENTIALS with your AWS credentials in this format:
					[default]
aws_access_key_id = YOUR_ACCESS_KEY
aws_secret_access_key = YOUR_SECRET_KEY
Create the secret:
kubectl apply -f aws-credentials.yaml
Then, create a ProviderConfig to use these credentials:
					# aws-provider-config.yaml
apiVersion: aws.crossplane.io/v1beta1
kind: ProviderConfig
metadata:
  name: default
spec:
  credentials:
    source: Secret
    secretRef:
      namespace: crossplane-system
      name: aws-creds
      key: credentials
  region: us-west-2
Apply the configuration:
kubectl apply -f aws-provider-config.yaml
Managing AWS Resources
Simple Resource Creation
Let’s create an S3 bucket as a simple example:
					# s3bucket.yaml
apiVersion: s3.aws.crossplane.io/v1beta1
kind: Bucket
metadata:
  name: crossplane-example-bucket
spec:
  forProvider:
    region: us-west-2
    acl: private
    locationConstraint: us-west-2
  providerConfigRef:
    name: default
Apply this configuration:
kubectl apply -f s3bucket.yaml
Check the status:
kubectl get bucket.s3.aws.crossplane.io crossplane-example-bucket
Confirm also bucket build on AWS Console.
Clean Up:
Clean up bucket Created:
kubectl delete -f s3bucket.yaml
Delete Provider Config:
kubectl delete -f aws-provider-config.yaml
Delete the secret created:
kubectl delete -f aws-credentials.yaml
Delete the AWS provider:
kubectl delete provider-aws
remove Crossplane System
helm delete crossplane -n crossplane-sytem

